Vmango manages virtual machines across multiple local or remote libvirt hosts
from one web interface. Configure your
hypervisor, storage pools and networking first, then connect Vmango to launch
and manage machines from your browser.
Get started
Binary quick start: download a release, connect a host and
configure your web login.
Docker installation: run the published amd64 or arm64 image
with persistent state and an HTTPS proxy.
Multiple hosts: connect several
hypervisors to one Vmango instance.
The example configuration
documents settings for hosts, images, authentication and event hooks.
Explore the interface
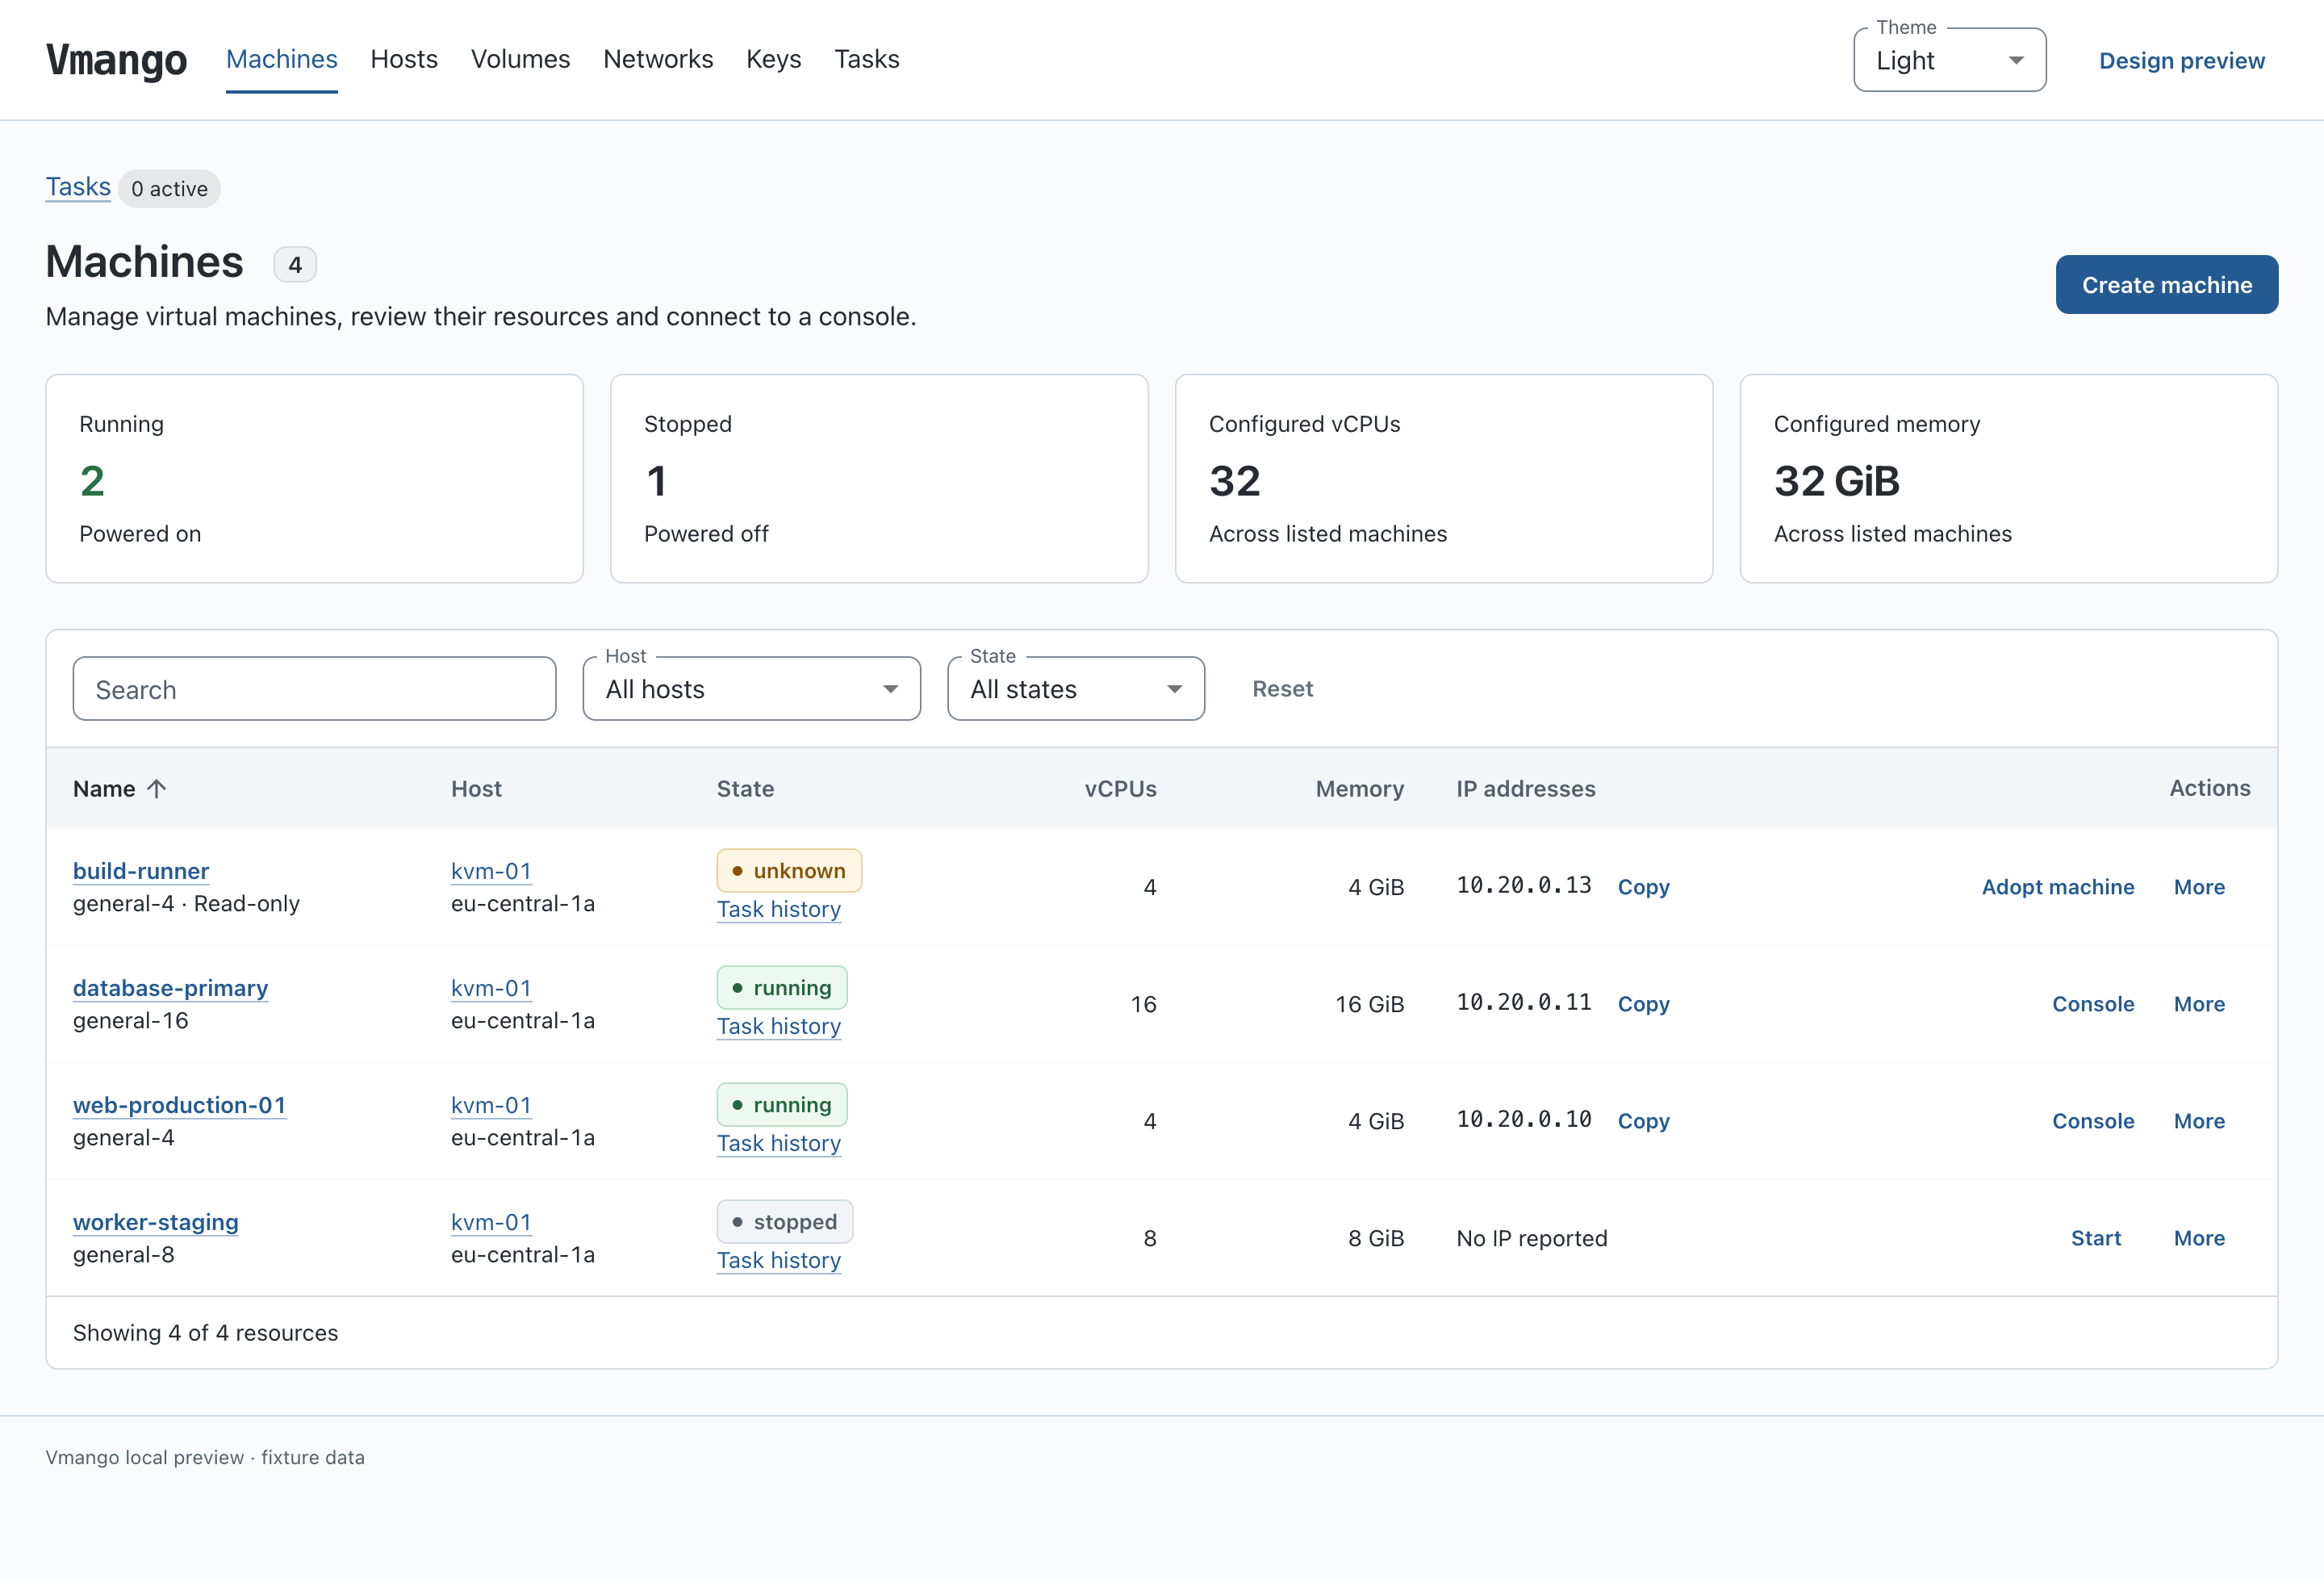
Choose a namespace and cloud, then review machine states, configured resources
and IP addresses in that workspace’s inventory.
Filter by host or state, and open a machine to inspect its settings or connect to
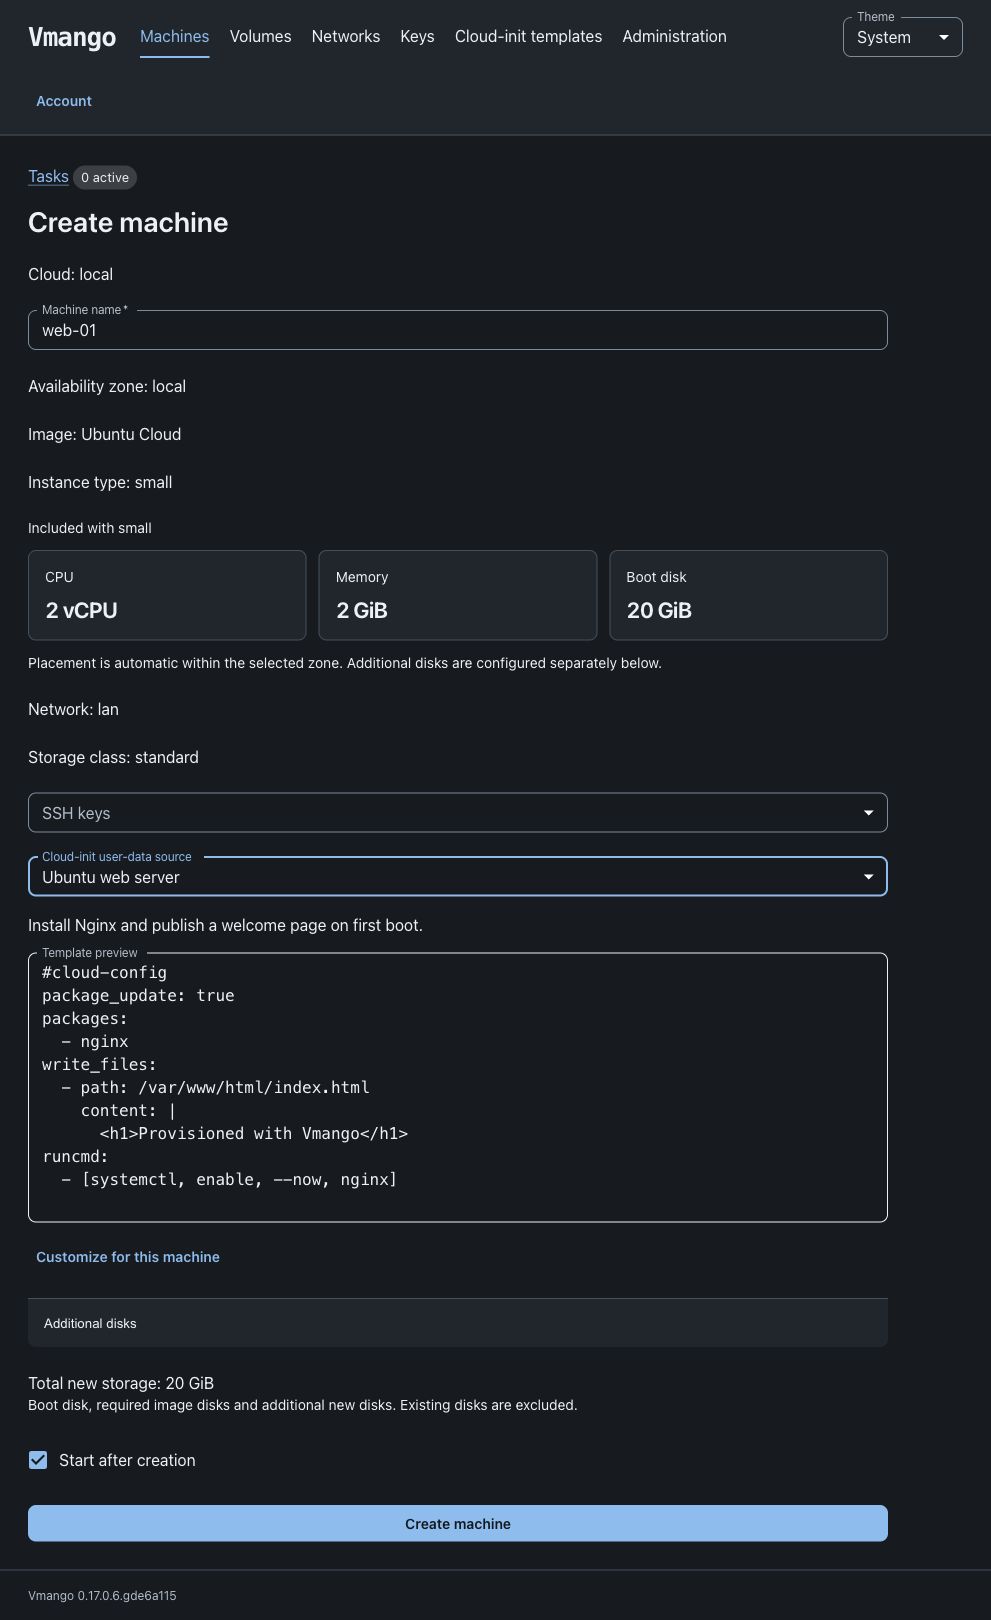
its console. These screenshots use demonstration data; select a screenshot to
view it at full size.
Machine inventory and resource summaries.
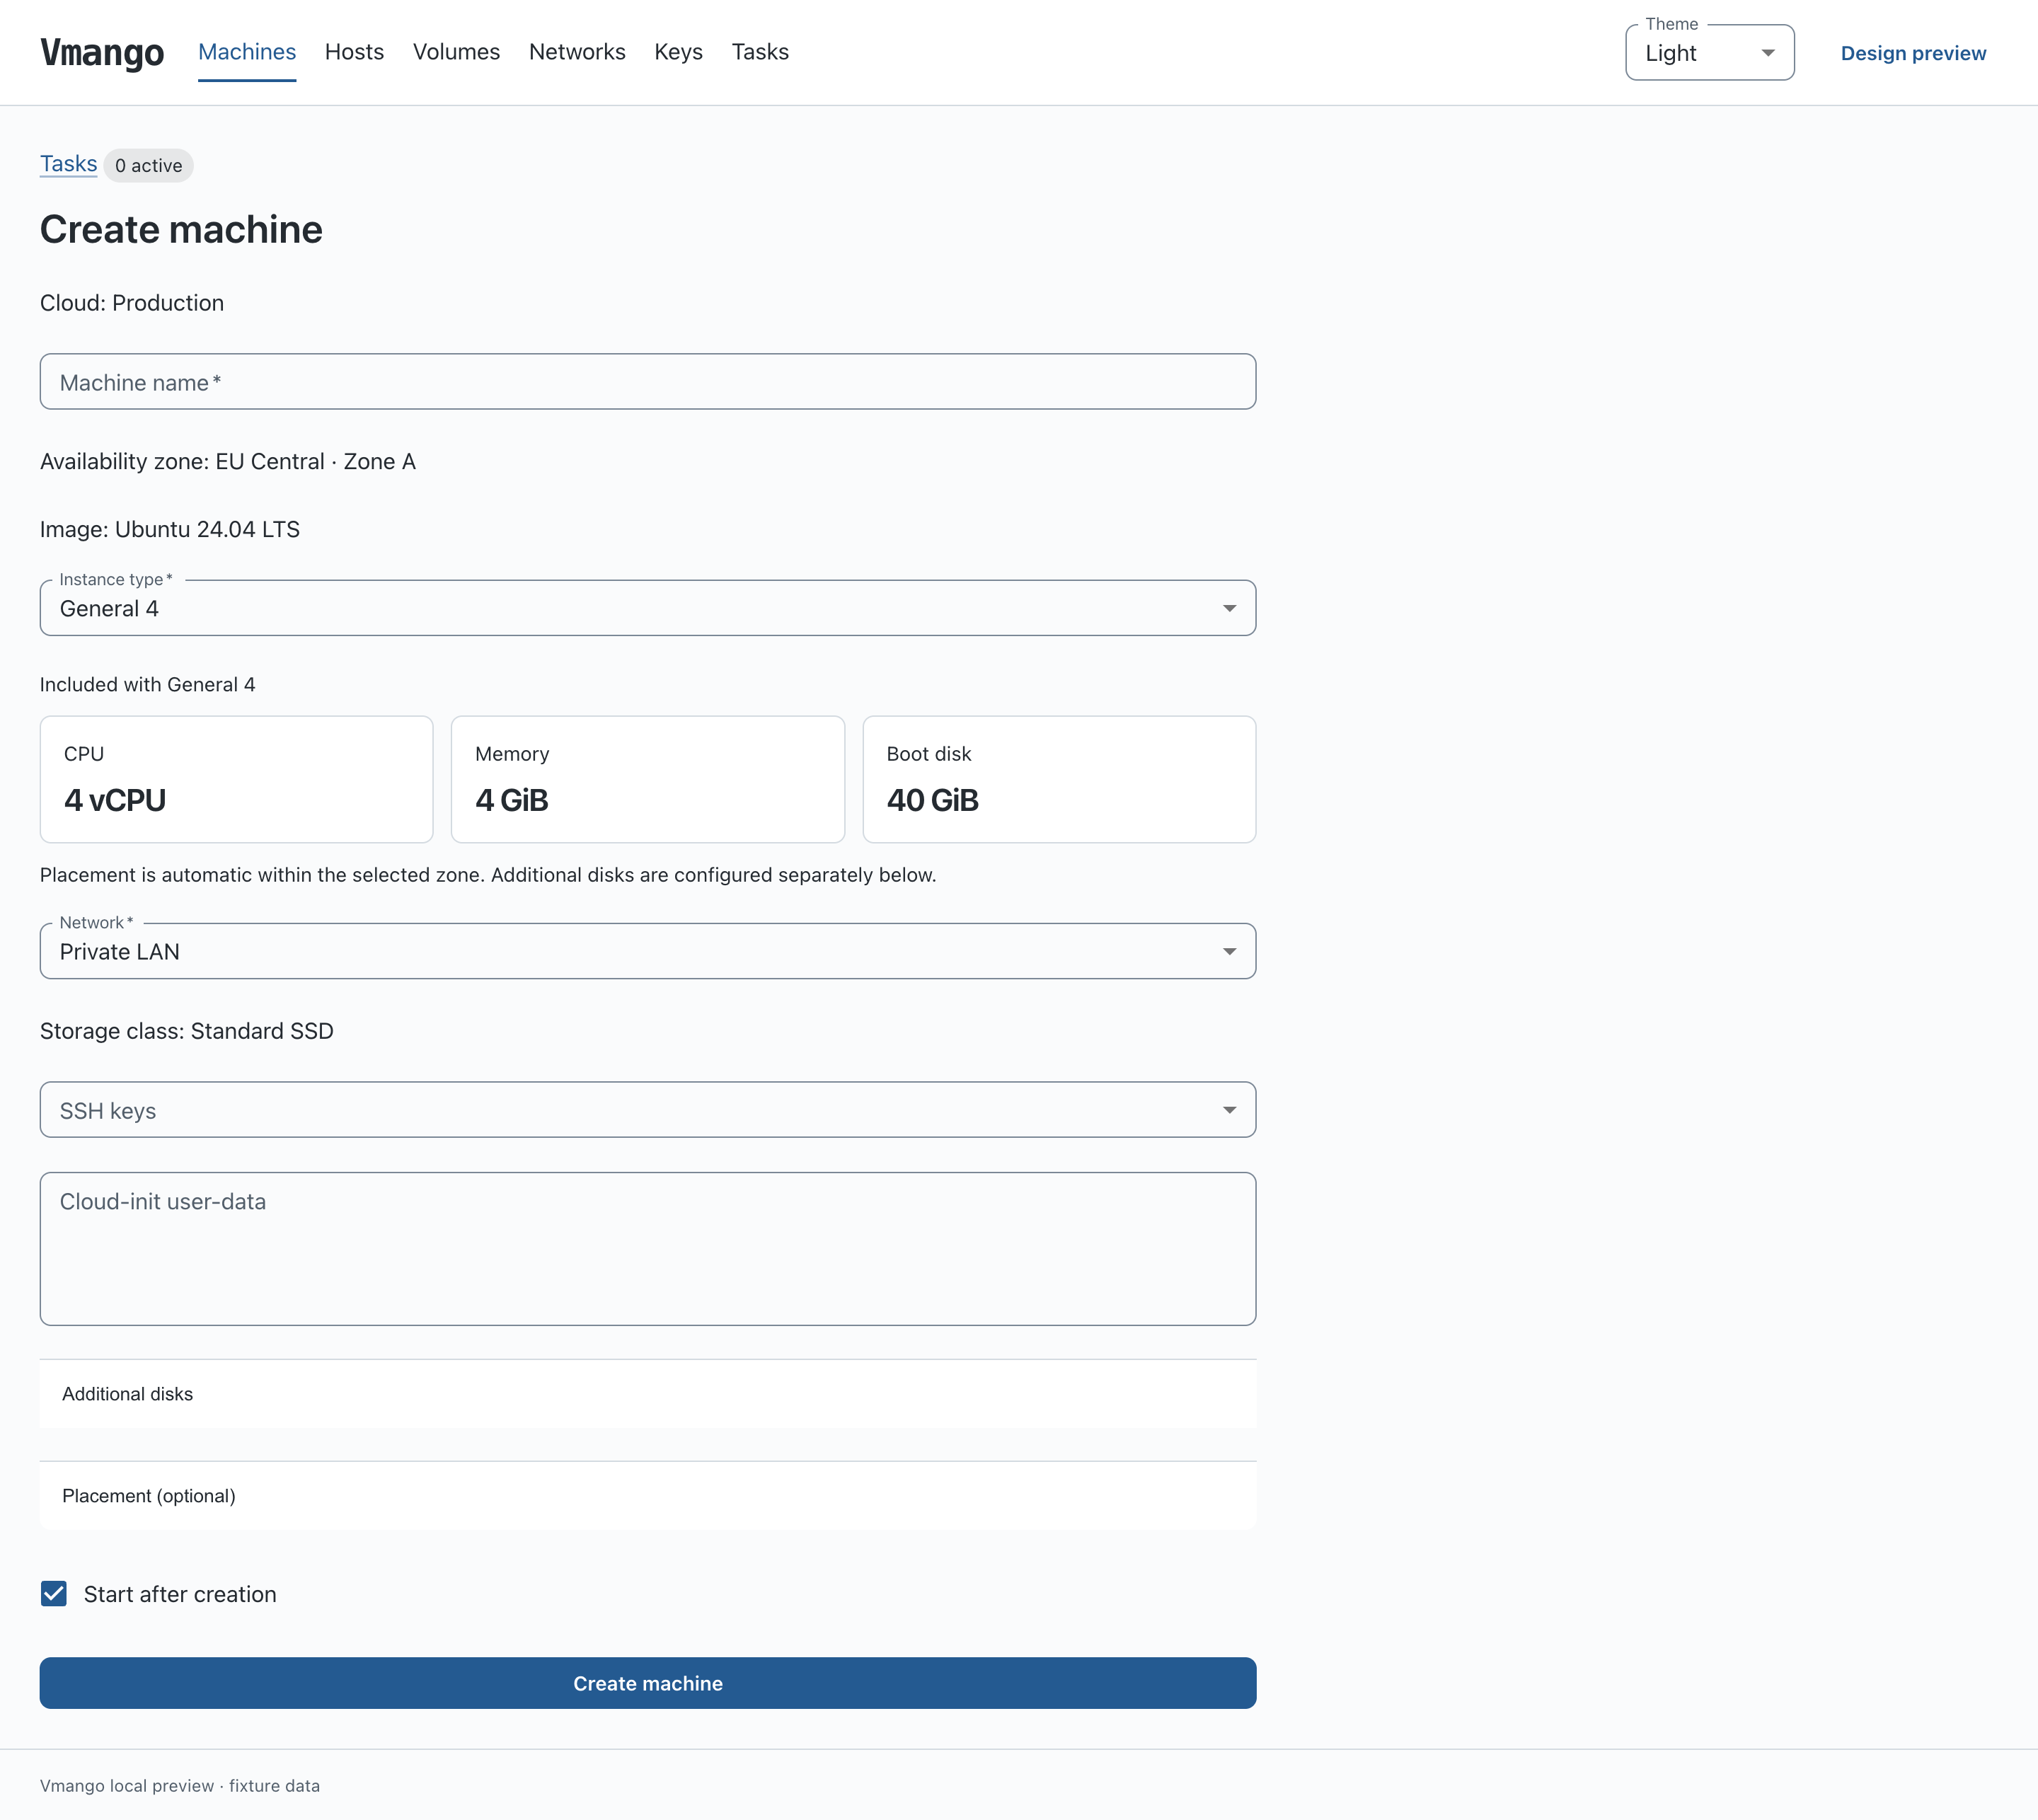
The creation form shows the CPU, memory and boot disk included with the selected
instance type before you launch a machine.
Choose an image, instance type, network and SSH keys. Demonstration data.
A cloud configuration example
Replace the cloud "local" block in the
quick-start configuration with this example, keeping its image
and API settings. It connects a local Linux/KVM host and offers two instance
types. It uses the existing ubuntu-24.04-x86_64-bios image definition and assumes
an active libvirt network and a writable storage pool, both named default.
Download Vmango, connect a libvirt host and open the web interface.
Download an archive and SHA256SUMS from
GitHub Releases.
Choose the Vmango server’s architecture, which may differ from the guest VM’s
architecture. No Docker or Go compiler is needed.
On macOS and Linux, vmango install --config /absolute/path/vmango.conf starts
a temporary loopback wizard for preparing Linux hosts locally or over SSH.
It requires a separately supplied pinned Richt executable. Review OS changes,
network/storage changes and the final configuration independently; the wizard
does not start or restart the Vmango server. See the
installer guide
for the exact runtime build, prerequisites, permissions and recovery steps.
Local macOS hypervisor provisioning and Windows controllers are outside this
wizard’s scope. The manual setup below remains available.
Choose an archive
Replace VERSION below with the version shown on the release, without its v prefix.
Archive
Runtime
vmango-VERSION-linux-x64.tar.gz
x86_64 Linux with glibc 2.35 or newer; built on Ubuntu 22.04
vmango-VERSION-macos-arm64.tar.gz
Apple Silicon, macOS 15 or newer, Homebrew in /opt/homebrew
vmango-VERSION-windows-x64.zip
64-bit Windows; CI runs on Windows Server 2022; connects to a remote libvirt host
These are dynamically linked applications. The Windows ZIP includes libvirt DLLs,
their dependencies, virsh.exe, license notices and a package manifest. Keep them
next to vmango.exe. Linux and macOS use system-installed libvirt libraries.
The archives include a minimal configuration and this guide.
genisoimage supplies the mkisofs and isoinfo commands used to create and read
cloud-init config drives. Other distributions need equivalent packages; Alpine’s
musl runtime is not supported by this Linux archive.
The binary links to Homebrew’s libvirt in /opt/homebrew. dvdrtools provides
mkisofs and isoinfo. This does not configure a local hypervisor: use a remote
Linux/KVM host for this quick start. Local QEMU/HVF needs separate setup.
The binary is not Developer ID signed or notarized; follow your organization’s
policy for downloaded executables.
Windows prerequisites
Extract the complete ZIP. The bundled libvirt client does not run a Windows
hypervisor. Use a remote Linux/KVM host with authenticated TLS (qemu+tls).
Follow libvirt’s TLS setup and
Windows client certificate locations.
Do not substitute an unauthenticated public TCP connection.
The bundled Windows client cannot use SSH: qemu+ssh is unsupported on Windows,
and the Fedora MinGW libvirt build has both qemu+libssh and qemu+libssh2
disabled. Installing OpenSSH or adding a libssh2 DLL does not enable these
transports. CI probes all three URIs with the packaged virsh.exe; using SSH
would require a different libvirt build and a separate connection test.
The archive does not include ISO tools. Creating or reading cloud-init config
drives requires Windows-compatible mkisofs.exe and isoinfo.exe on PATH.
Until those are installed, use Windows for managing existing VMs; provisioning
with config drives is not covered by the Windows CI smoke check. Event hook
scripts also require a sh executable. See the verification scope below.
Verify and unpack
On Linux, from the directory containing the archive and checksums:
sha256sum --ignore-missing -c SHA256SUMS
tar -xzf vmango-VERSION-linux-x64.tar.gz
cd vmango-VERSION-linux-x64
cp vmango.quickstart.conf vmango.conf
On macOS:
shasum -a 256 vmango-VERSION-macos-arm64.tar.gz
# Compare the result with this archive's line in SHA256SUMS.tar -xzf vmango-VERSION-macos-arm64.tar.gz
cd vmango-VERSION-macos-arm64
cp vmango.quickstart.conf vmango.conf
On Windows, in PowerShell:
Get-FileHash.\vmango-VERSION-windows-x64.zip-AlgorithmSHA256# Compare the result with this archive's line in SHA256SUMS.Expand-Archive.\vmango-VERSION-windows-x64.zip-DestinationPath.Set-Location.\vmango-VERSION-windows-x64Copy-Itemvmango.quickstart.confvmango.conf# Make the bundled virsh and any tools in this directory available by name.$env:PATH="$PWD;$env:PATH"
Connect a hypervisor
For Linux running on an already configured KVM host, verify access as the same
user who will run Vmango:
virsh -c qemu:///system list --all
For Linux or macOS connecting to a remote host, first configure SSH key access
and confirm the host key interactively. The remote account must have permission
to use the libvirt system socket:
ssh libvirt@hypervisor.example.com
virsh -c 'qemu+ssh://libvirt@hypervisor.example.com/system' list --all
Use that URI in vmango.conf. On Windows, test the configured TLS connection
with the bundled client:
Edit the archive’s vmango.quickstart.conf and save it as vmango.conf. Keep
its shipped namespace, image and cloud blocks. The excerpt below shows only connection
and login settings; it is not a complete cloud configuration:
key_file="./authorized_keys"namespace"platform" {
name="Platform" clouds=["local"]}
cloud"local" { # Keep the shipped images, zone, instance types, network and storage class.
host"local" {
uri="qemu:///system" config_drive_pool="default" zone="local" # Keep the shipped reserves, network and storage bindings here.
}
}
api {
listen="127.0.0.1:8080" base_url="http://localhost:8080" jwt_signing_key_file="~/.vmango/jwt_signing_key"user"admin" {
hashed_password="REPLACE_WITH_GENPW_OUTPUT" }
}
Replace uri inside cloud "local" → host "local" with the verified URI.
The host name local is its stable identity; connection and backend settings
belong directly in that host block. Use an existing, active storage pool for
config_drive_pool. For example, check virsh -c URI pool-list --all.
HTTPS
For access from other computers, configure HTTPS either directly in Vmango or
through an HTTPS reverse proxy. Native HTTPS uses the existing api.listen
address; edit the api block in your configuration:
api {
listen=":8443" base_url="https://vmango.example.com:8443" tls_cert_file="/etc/vmango/tls/fullchain.pem" tls_key_file="/etc/vmango/tls/privkey.pem" # Preserve your users, signing-key paths and credential-store settings.
}
tls_cert_file contains the PEM server certificate followed by its intermediate
certificates, and tls_key_file contains its matching unencrypted PEM private
key. Use a certificate valid for the hostname clients connect to and trusted by
their browsers. Both files must be readable by the process user (vmango for
RPM/DEB services); restrict access to the private key. Absolute paths are
recommended; ~/ paths are expanded using the process user’s home directory.
Setting both fields enables HTTPS only on that address, with TLS 1.2 or newer.
There is no separate HTTP listener or automatic redirect. Leaving both empty
preserves HTTP. Setting just one field, or supplying unreadable, malformed or
mismatched files, prevents startup. Port 8443 works without privileged-port
permissions in packaged services.
Secure authentication cookies and console wss:// connections are automatic
with native HTTPS; session_secure = true is not required. If base_url is set,
it must be an absolute HTTPS URL. Set it to the public URL, including a
nonstandard port, for OIDC callbacks and absolute shared console links.
Certificate issuance and renewal are managed externally. Vmango loads the
certificate and key once at startup; replace them and restart Vmango after
renewal. For a packaged service, use systemctl restart vmango.
Behind an HTTPS reverse proxy, leave the TLS file fields empty to keep the
upstream listener on HTTP, set base_url to the public HTTPS URL and enable
session_secure. Bind the upstream to loopback or a private network. The proxy
must preserve the public Host, Origin and Sec-Fetch-Site headers and support
WebSocket upgrades.
Manage multiple hosts
One Vmango instance can manage virtual machines across multiple local or remote
libvirt hosts from the same web interface. Add a host block inside the cloud
for each hypervisor. Host names and connection URIs must be globally unique.
The following replaces the cloud "local" block in the quick-start configuration;
keep its nested image definitions:
This example connects a Linux Vmango server to its local KVM host and a remote
host over SSH. Use connection types supported by your server platform;
Windows requires remote hosts with authenticated TLS, as described above.
Verify each URI and its storage pool as the user running Vmango. Pool names
refer to pools on each respective host; they do not create shared storage.
Each host contains its connection settings, AZ, logical networks and storage
classes together. Multiple hosts can share one AZ. Restart Vmango after changing
the configuration. The scheduler selects the host when creating a VM; the user
does not select a node. See configured clouds and scheduling.
Set a password and start
Run ./vmango genpw (PowerShell: .\vmango.exe genpw), enter your administrator
password, and paste the printed bcrypt hash into hashed_password without
changing its $ characters. Run this in an interactive terminal.
API JWTs and console links share one Ed25519 signing key, stored as an unencrypted
PKCS#8 PEM file with mode 0600. The default is ~/.vmango/jwt_signing_key;
override it with api.jwt_signing_key_file. A missing file or contents that cannot
be decoded as PEM, including an old hex secret, is replaced automatically at
startup. This invalidates old signed tokens and console links. An unsupported or
invalid key in a decodable PEM file causes a startup error and is left untouched.
Preserve the private file across restarts. Remove the obsolete
api.console_signing_key_file and any old inline key settings from configuration.
Start from the extracted directory, which must be writable:
./vmango web -c vmango.conf
On Windows:
.\vmango.exeweb-cvmango.conf
Open http://localhost:8080/ and log in as admin with
the password you just entered. Choose Platform in the Namespace selector,
then select the local cloud. Read-only host diagnostics are available under
Administration → Clouds → local → Hosts. Stop the
foreground server with Ctrl+C.
A namespace groups your machines, disks, keys, templates and tasks into a
workspace. The shipped configuration allows Platform to use the local cloud.
See Namespaces to add workspaces or use multiple clouds.
Existing machines and disks need explicit assignment after an upgrade; find
them in Administration and follow the guide’s migration instructions.
To create a VM, first check the cloud catalog and host bindings,
then follow the cloud images and provisioning guide
to use the shipped lazy downloadable catalog or register a manually prepared
source volume on the hypervisor in vmango.conf. Administrators prepare the
hypervisor’s pools and networking and configure private host bindings. Users
then create machines from catalog references; they do not select raw pools or
image paths. The binary archive does not configure KVM, pools or networks for you;
a missing downloadable image is prepared when an accepted create task needs it.
For remote browser access, use native HTTPS or an HTTPS reverse proxy
and set api.base_url to the public URL. Behind a proxy, enable
api.session_secure and preserve Host, Origin and Sec-Fetch-Site.
Remote VNC access needs HTTPS too.
SSH console forwarding also needs ssh locally and socat or nc on the
hypervisor. TLS-connected consoles require network reachability to the host’s
VNC port; a successful libvirt TLS connection alone does not tunnel VNC.
Troubleshooting empty clouds or hosts
Select a namespace and confirm its clouds list includes the desired cloud.
An empty selector requires a namespace block in the configuration and a restart.
Existing unassigned machines remain visible in Administration inventory.
Check the startup log for the configuration filename. Use -c explicitly
if the current directory differs from the extracted archive.
Define at least one host "name" inside a cloud, including its uri.
Hosts are configured explicitly,
not discovered automatically.
Read cannot get node / cannot open libvirt connection messages. A failed
connection is omitted from the node list.
Run virsh -c 'EXACT_URI' list --all as the same user and with the same
environment. Fix socket permissions, SSH keys, host-key trust or TLS
certificates there first. A remote account may need membership in the host’s
libvirt group and a new login session.
Define a cloud catalog and put each connection’s settings in its host
block, including its AZ and network/storage bindings. Top-level libvirt
blocks must be migrated into cloud hosts.
Verify the pool exists and is active on that connection. An empty VM list
is normal on a new host and does not mean that no nodes are configured.
Verification scope
CI builds each archive, extracts it and checks server startup, login and a node
using libvirt’s test:///default driver. Unit tests run on Linux, macOS and
Windows. This checks dynamic loading and the HTTP path, not a real hypervisor.
Linux and macOS CI also checks an ISO round trip with the installed tools.
Windows config-drive tools and real Windows-to-Linux TLS/VM operations require
separate integration verification before claiming those deployment scenarios
as tested. A successful macOS check does not establish Linux/KVM behavior.
Verify VM lifecycle operations on a real hypervisor before release.
See the release process.
2 - Docker installation
Run the Vmango Docker image on Linux amd64 or arm64 and connect existing libvirt hosts.
The subuk/vmango image on Docker Hub
includes Vmango, its web interface, libvirt clients, SSH, CA certificates and
the ISO tools used for cloud-init config drives. It connects to existing
hypervisors; it does not start a libvirt daemon or configure a KVM host.
Choose an image
docker pull subuk/vmango:0.15.1
The examples below pin release 0.15.1. Use a published version from
Docker Hub when upgrading.
Tag
Contents
0.15.1
Release image for Linux amd64 and arm64; Docker selects the matching platform
latest
Latest stable release, with both Linux platforms
0.15.1-amd64
Explicit Linux amd64 image
0.15.1-arm64
Explicit Linux arm64 image
Prereleases have version-specific tags and do not update latest. The image’s
architecture is the Vmango server’s architecture; guest VM architectures
depend on the connected hypervisors and configured images.
Prepare the configuration
Export the example configuration from the same image you will run. Start in a
new directory so the command does not overwrite an existing vmango.conf:
mkdir vmango-docker
cd vmango-docker
docker run --rm --entrypoint cat subuk/vmango:0.15.1 /etc/vmango.conf > vmango.conf
docker run --rm -it subuk/vmango:0.15.1 genpw
Enter an administrator password in the interactive terminal. In vmango.conf,
add a user "admin" block inside the existing api block and paste the printed
bcrypt hash into hashed_password. Preserve its $ characters.
For deployment behind an HTTPS reverse proxy, keep api.listen = ":8080"
and set api.base_url to your public HTTPS URL.
The following shows the relevant API settings; edit the existing block rather
than appending a second one:
Keep the shipped image, cloud and tasks blocks and the state paths under
/var/lib/vmango. Configure the existing storage pools and networks for each
host, following configured clouds and scheduling. The
image guide explains the managed image catalog.
To terminate HTTPS in Vmango instead, set tls_cert_file and tls_key_file
inside the existing api block and mount their containing directory read-only
into the container, for example -v "$PWD/tls:/etc/vmango/tls:ro". Use container
paths such as /etc/vmango/tls/fullchain.pem and /etc/vmango/tls/privkey.pem in
the configuration. The existing :8080 listener then serves HTTPS only; the
published port mapping can stay the same. Set base_url to the public HTTPS URL
with its external port. Secure cookies and console WSS connections are
automatic. Files must be readable by the container’s Vmango user. After
externally renewing the certificate, restart the container to reload it. See
native HTTPS configuration.
Connect a libvirt host
Remote hosts over SSH
Inside the existing cloud "local" → host "local" block, replace the URI:
The SSH account must have permission to use libvirt on that hypervisor.
Prepare a dedicated SSH directory with its private key, public key and a
known_hosts file containing the verified hypervisor host key. Mount that
directory read-only at /var/lib/vmango/.ssh when starting the container:
The image runs as UID/GID 10001:10001. Its user must be able to traverse the
mounted directory and read the key, SSH configuration and known_hosts.
Keep private keys restricted to their owner. Set ownership on a dedicated copy
of these files rather than changing your personal SSH directory.
Use an SSH config file in that directory if the key has a non-default name or
the host uses a custom SSH port. Passphrase-protected keys require a separately
configured SSH agent. Do not disable host-key checking.
Test the connection with the same mounted SSH directory before starting Vmango:
docker run --rm \
  --mount type=bind,src=/absolute/path/to/vmango-ssh,dst=/var/lib/vmango/.ssh,readonly \
  --entrypoint virsh subuk/vmango:0.15.1 \
  -c 'qemu+ssh://libvirt@hypervisor.example.com/system' list --all
A local Linux libvirt socket
For qemu:///system on the Docker host, mount its libvirt socket directory at
/run/libvirt and grant the container user the socket’s numeric group ID. For
example, add these options to the container command, replacing LIBVIRT_GID
with that group ID:
The socket and any libvirt access policy must allow that group to connect.
Verify the URI with virsh using the same mount and supplementary group.
This example is for a Linux host; Docker Desktop does not expose a macOS libvirt
socket automatically. Use a reachable remote host for that setup.
Start behind an HTTPS proxy
Create a named volume for application state, then run Vmango. Add the SSH mount
or libvirt socket options from the previous section to match your host URI.
Point an HTTPS reverse proxy on the Docker host at http://127.0.0.1:8080.
It must preserve the public Host, Origin and Sec-Fetch-Site headers and
support WebSocket upgrades for the serial and VNC consoles. Open the public
HTTPS URL from api.base_url and sign in with the configured administrator.
Docker forwards a non-loopback peer address to the container, so the API’s
localhost HTTP exception does not apply even when the published host port is
bound to 127.0.0.1. Configure both api.base_url with an HTTPS URL and
api.session_secure = true; use the proxy for browser access. If the proxy runs
in another container, put both on a private Docker network and proxy to
http://vmango:8080 instead of the proxy container’s own localhost.
The named volume stores the signing key, SSH key records, sessions, API-token
metadata and durable task/image/volume metadata. VM disks and downloaded cloud
images remain in the storage pools on the hypervisors.
Upgrade and troubleshoot
Back up vmango.conf and vmango-data. Pull the desired version, stop and remove
only the application container, then recreate it with the new image and the
same configuration, data volume and connection mounts. Keep the named volume
across upgrades so credentials and task history survive.
Symptom
Check
Login or API returns 403 transport_rejected
HTTPS proxy, public api.base_url and api.session_secure
State or signing-key permission error
Write access to the data volume for UID/GID 10001:10001
SSH host cannot connect
Key permissions, verified known_hosts, host URI and remote libvirt permissions
Local libvirt socket cannot connect
Socket mount, numeric supplementary group and host access policy
Host is unavailable or resources are missing
virsh from the same container environment; existing active pools and networks
Release checks build and start both images on native runners, test JWT login,
the embedded UI, libvirt’s test driver and signing-key persistence across
restart. Real KVM/HVF lifecycle operations and production SSH/TLS connections
need separate integration checks.
3 - Namespaces
Organize machines, disks, keys and templates into workspaces, and choose where to work.
A namespace is a named workspace for a group of virtual machines and their
resources. For example, use platform for shared services and analytics for
data-processing workloads. Each workspace has its own machines, volumes, SSH
key catalog, cloud-init templates and workload tasks.
A cloud describes where machines can run: its hosts, images, instance types,
networks and storage classes. A namespace selects which configured clouds its
workloads may use. Two namespaces can share the same cloud and physical hosts;
one namespace can use several clouds.
For example, Platform and Analytics can both run machines in the local cloud,
while Platform also uses edge. Selecting Analytics shows its workloads, even
when Platform machines are running on the same host. Both workspaces may have a
machine called web; Vmango keeps their backend identities distinct.
Namespaces organize resources and prevent operations from accidentally combining
resources from different workspaces. Every authenticated user can currently
select every configured namespace. Namespaces do not provide per-user access
permissions, separate guest networks or CPU/storage quotas. Hosts and their
available capacity remain shared.
Configure a namespace
The installation administrator adds namespace blocks to vmango.conf, alongside
the existing cloud and API blocks. For a single workspace using an existing
cloud "local", start with:
The shipped quick-start configuration already contains this namespace; edit it
instead of adding another block with the same ID. Even a single-workspace
installation needs an explicit namespace.
Setting
Meaning
"platform"
Stable namespace ID used in links, API requests and saved resource assignments. Keep it when changing the display name.
name
Name shown in the selector. Optional; defaults to the ID.
description
Optional explanation for operators.
clouds
One or more existing cloud IDs this workspace may use. IDs must be unique in the list.
If cloud "edge" is also configured, Platform can use both with
clouds = ["local", "edge"]. This list refers to cloud IDs, not host names.
Restart Vmango after editing the configuration. Namespace creation and changes
are performed in the configuration file; the web interface displays them under
Administration → Namespaces.
Changing the name changes the displayed name. Changing the block’s ID creates
a different workspace; it does not rename or move existing resource assignments.
Work in a namespace
Sign in and choose Platform in the Namespace selector. If the URL has
no namespace, Vmango asks you to choose one, including on single-workspace
installations.
On Machines or Volumes, choose a Cloud from those allowed for the
workspace. If there is only one available choice, it may already be selected.
Add provisioning keys under Keys and reusable user data under
Cloud-init templates. These catalogs belong to the namespace and can be
used in any of its allowed clouds. Add a key or template separately in another
namespace when it should also be available there.
Select Create machine and follow the provisioning guide.
The new machine and its disks belong to the selected namespace. Its display
name may match a name in another namespace. The optional guest hostname is
configured separately from that display name.
Use Tasks to follow work accepted in this namespace. Switching namespace
changes the task list; already accepted operations retain their original
namespace and continue there.
Switch workspaces using the Namespace selector. Machine and disk lists,
keys, templates and tasks then use the new workspace. Save or discard unfinished
form edits when prompted; changing workspaces also disconnects an embedded
console. To attach a disk to a machine, both must belong to the same namespace
and satisfy the selected cloud’s placement rules. Selecting another namespace
does not transfer a machine or disk between workspaces.
Links and separate tabs
The current tab’s URL records its workspace, for example:
Copy the full URL when sharing a workload page. Reload and Back/Forward restore
the namespace from that URL. You can keep Platform open in one tab and Analytics
in another; their selections are independent. A missing namespace prompts for a
choice. An unknown or malformed namespace shows an error instead of silently
opening a different workspace.
Find and assign existing resources
After upgrading an older installation, existing VMs and disks have no namespace
until explicitly assigned. They are visible in Administration → Clouds →
your cloud → Machine inventory / Volume inventory, even if workload lists are
empty. Administration also shows resources belonging to other namespaces and
provides Task history across namespaces. Its inventories do not depend on
the current workspace selection.
For an individual unassigned resource:
Open its details in the Administration cloud inventory.
Choose a Destination namespace, then Open assignment preview.
Select Preview assignment and review the machines and disks together.
Assigning a VM includes its attached disks and VM-owned artifacts. A graph
containing resources already assigned to another namespace is rejected.
Select Assign to platform (the button uses your destination’s ID), then
Track task. Wait for successful
completion before using the resource in the destination workspace.
Assignment does not move disk data or grant Vmango permission to delete a disk
that it did not create or adopt under its existing deletion-safety rules.
Resources already assigned to a namespace cannot be transferred to another
namespace through this workflow.
For an installation upgrade or bulk assignment, use the
migration and recovery guide.
It covers stopping Vmango, backing up state, previewing an explicit mapping,
applying it and recovering interrupted work. Existing SSH keys and templates
must be explicitly selected for migration; they are not automatically copied
into every workspace. API clients must also send the new namespace header.
Common questions
Why is my cloud missing? Check the selected namespace’s clouds list and
restart Vmango after changing it. Adding a namespace does not configure hosts,
networks or storage pools; see cloud configuration.
Why is my machine missing? Check the Namespace and Cloud selectors, then use
Administration inventory to inspect its assignment. Machines created outside
Vmango or before the upgrade may still be unassigned. A warning about unavailable
hosts means the inventory may be incomplete.
What happens if I remove a namespace block? It disappears from the selector
after restart and cannot accept new work. Its machines, disks, keys, templates
and history remain stored. Administration still shows the saved namespace ID.
Restore the same ID with the required clouds to use it again. Removing a block
is not a resource-deletion operation.
What must I back up? VM assignments are stored in libvirt domain XML;
volume assignments, keys and templates are stored on the Vmango application
host beneath namespace_directory (default ~/.vmango/namespaces). Preserve
both along with the rest of the installation state. Follow the
backup and restore procedure
before moving the server or restoring an installation.
How do scripts choose a workspace? Discover configured choices with
GET /api/v1/namespaces, then send X-Vmango-Namespace: platform on workload
requests. The browser’s ?namespace= convention is not an API query parameter.
See the API guide.
4 - Package installation
Install release packages on Ubuntu, Debian and RHEL.
Use the release repositories below. Configure /etc/vmango.conf for your
libvirt host and web login before starting the service.
For a container deployment with bundled dependencies, see
Docker installation.
The release PPA
contains separate Jammy, Noble and Resolute builds.
Debian 12 and 13 (amd64)
Use the Ubuntu 22.04 Jammy build from the release PPA. These are Ubuntu
packages, not native Debian builds. The package validation workflow checks
installation, server startup, login and a libvirt test node on Debian 12
(Bookworm) and Debian 13 (Trixie). Real KVM operations require separate testing.
Add only the Vmango PPA, with its signing key restricted to this repository:
Verify the primary key fingerprint is
1053 8B83 BC93 D600 E0C9 8A39 AF0F 3962 6296 5789, also shown on the
PPA overview.
Then install the key and add the repository:
Keep Suites: jammy on both Debian versions. Do not replace it with
bookworm or trixie, and do not add Ubuntu’s main repositories to Debian.
The Go compiler and compiler PPA are not needed to install binary packages.
RHEL 8/9/10 and CentOS Stream 10 (x86_64)
On RHEL 8/9 or CentOS Stream 10, enable the release repository and install
the package:
The EPEL 10 build uses CentOS Stream and requires a newer libvirt than the
RHEL 10 build. Select rhel-10-x86_64 on RHEL 10 to use its matching dependencies.
The COPR plugin normally selects an epel-* repository. Both EPEL and RHEL
repositories are published for versions 8, 9 and 10 on x86_64.
Target
Build environment
rhel-8-x86_64, rhel-9-x86_64, rhel-10-x86_64
RHEL without EPEL build dependencies
epel-8-x86_64, epel-9-x86_64
RHEL + EPEL
epel-10-x86_64
CentOS Stream + EPEL
To use a RHEL build explicitly, append the matching target to the enable
command, for example sudo dnf copr enable subuk/vmango rhel-8-x86_64.
Use rhel-9-x86_64 or rhel-10-x86_64 for RHEL 9 or 10 respectively.
See the release COPR project
for completed builds and repository setup for your system.
Configure and start
Edit /etc/vmango.conf, configure a password and connect a libvirt host as
described in the quick-start guide. Package installation does
not configure a hypervisor, storage pools or VM images.
On systems where the package installs the systemd unit:
sudo systemctl enable --now vmango
5 - Cloud images and provisioning
Find cloud images, register them in Vmango and launch a virtual machine.
Vmango starts machines from pre-installed cloud images. There is no need to boot
an installer or mount an installation CD for each VM: cloud-init handles the
initial configuration on first boot.
Image entries are exposed to users through a configured cloud. Define the
cloud catalog and host bindings before creating machines.
Cloud-owned downloadable catalog
vmango.dist.conf ships twelve pinned QCOW2 definitions: Ubuntu 24.04 LTS,
Debian 13 Generic, Fedora Cloud Base 44, AlmaLinux GenericCloud 9.8,
Rocky Linux GenericCloud 9.8 and Alpine 3.24.3 cloud-init VM images, each for
x86_64/BIOS and aarch64/UEFI. The Alpine images use Limine; the selected boot
mode is explicit in each catalog ID and label. These settings describe the
selected variants, not universal BIOS/UEFI or cross-architecture compatibility.
The selector filters architecture and launch requirements using node capabilities.
Each image entry belongs inside its owning cloud and is available on compatible
nodes of that cloud. Equal image IDs in different clouds are independent.
Set image_pool directly in each existing cloud host. This excerpt shows the
image storage settings; keep the cloud’s catalog and each host’s zone,
network and storage-class bindings:
cloud"local" { # Keep the cloud catalog here.
host"local" {
uri="qemu:///system" image_pool="default" # Keep this host's zone and network/storage bindings.
}
host"remote" {
uri="qemu+ssh://libvirt@example.org/system" image_pool="cloud-images" # Keep this host's zone and network/storage bindings.
}
}
image_pool names an existing dir libvirt storage pool on that node and defaults
to default. The pool must be active, writable through libvirt, and have enough
free space for the artifact. Vmango does not create, start or mount pools.
Other pool types, including fs, netfs, LVM and RBD, are not supported for
managed image storage. VM destination disks use a logical storage class mapped
to a pool on the selected host.
The same catalog entry can use different pool paths on different nodes. Adding
a node needs only a cloud host block with its connection and pool binding,
without copying definitions within that cloud.
A downloadable entry has url, mandatory sha256 and source_format (raw or
qcow2), with no path. Use the complete definitions in vmango.dist.conf as
ready-to-use examples. SHA-256 covers the exact downloaded file bytes, not a
guest-visible filesystem or an unpacked disk. Add the archive settings below
when the download contains a disk inside ZIP or TAR. External QCOW2 backing/data
files, encryption and incompatible QCOW2 features are rejected.
Select a disk inside an archive
Keep url, sha256 and source_format, and add archive_format and
archive_member to select exactly one regular file:
Replace the URL, checksum, member name and size with the published artifact’s
values. archive_format accepts zip, tar and tar.gz. source_format remains
raw or qcow2 and describes the selected disk, not its container. Both archive
settings must be present together; omitting both retains direct-file downloads.
Local path entries do not use archive settings.
archive_member is the exact, case-sensitive path stored in the archive, using
forward slashes. Use a relative path without a drive prefix, leading slash,
backslashes, empty components, . or ... Vmango does not extract a directory
or follow symbolic/hard links: the selected member must be a single regular
file. Missing or duplicate matching members fail preparation. ZIP supports
stored and Deflate members, including ZIP64 and data descriptors; encrypted
members and unsupported compression methods are rejected. TAR supports plain
or gzip-compressed archives.
Optional exact selected file byte count after decompression
minimum_disk_gib
Minimum guest-visible boot disk capacity
Set extracted_size_bytes when known so placement can budget the actual image
storage. Without it, placement conservatively reserves image_transfers.max_bytes
for an unprepared archived image. A configured extracted size must agree with
the archive member; it is not the QCOW2 virtual capacity.
ZIP preparation makes two complete HTTP requests. The first verifies the archive
SHA-256 and reads its bounded central-directory metadata; the second streams the
selected disk to libvirt and verifies the full archive again before completing
the upload. ZIP metadata must fit in a 4 MiB tail window with at most 10,000 entries.
Split archives and nonstandard footer gaps are rejected.
This handles members whose local headers omit their sizes without keeping the
archive on disk. TAR and TAR.GZ use one HTTP pass; after the selected member,
Vmango scans the remainder before completing the upload to detect duplicates,
validate trailers and verify the complete download checksum. Nonzero data after
the TAR end marker is rejected; concatenated TAR archives are not supported.
image_transfers.max_bytes bounds the downloaded archive and the extracted disk
file separately. For TAR and TAR.GZ it also bounds the complete TAR stream after
decompression, including headers and skipped files. An archive may therefore exceed the limit
even when the selected disk fits. Checksum, ZIP CRC, gzip trailer, size or format
failures leave the image unverified and use the staging cleanup described below.
Archive payloads and extracted disks are never written to temporary files on the
Vmango application host. Only the selected disk is uploaded to the target pool.
Lazy preparation and progress
Configuration parsing, startup and discovery make no upstream image requests.
A missing compatible image remains selectable. The first accepted machine.create
prepares it on the selected node and then automatically continues creating the VM.
Closing the form or browser does not cancel accepted work.
The data path is upstream HTTP(S) → Vmango → libvirt volume upload. Download
and upload overlap with bounded buffers and backpressure for direct files and
TAR; ZIP first makes the verification pass described above. Vmango creates no image
payload file, temporary download, spool or application-side cache. The staging
volume and reusable verified image belong to the destination libvirt node, even
when Vmango and libvirt run on the same computer. Concurrent creates share one
preparation for the same connection, pool and artifact. Followers remain queued
while that artifact is in use by an active create, leaving workers available for
unrelated images and nodes. Different nodes prepare independently. Different image IDs can share bytes while supplying different
launch defaults. Archive format and selected member are part of the prepared
image identity, so different disks in one archive cannot reuse each other.
Task progress shows source inspection, destination preparation, concurrent
Download and upload image, final verification and normal VM provisioning.
Transfer progress includes forwarded bytes, percentage, average throughput and
estimated transfer time remaining. Speed includes destination backpressure; ETA
covers the transfer stage and excludes verification and VM creation. Estimates
are hidden when progress updates become stale.
The artifact byte size comes from Content-Length. If a source cannot provide it,
set source_size_bytes in the image definition. An error names this setting when
needed. This is the exact file byte count, separate from the QCOW2 virtual
capacity and minimum_disk_gib. If both HTTP and configuration provide sizes they
must agree. Truncated/oversized input and checksum mismatches fail the task.
QCOW2 virtual capacity and safety checks use a bounded header; source format and
capacity are confirmed from the resulting libvirt volume before cloning.
Optional application-wide limits:
image_transfers {
max_bytes=17179869184 # 16 GiB per download, extracted disk or decompressed TAR scan
timeout_seconds=3600 idle_timeout_seconds=120}
Verification, failures and pinned updates
Managed names identify the SHA-256 and format; archived sources also include
the archive format and member selection in their identity. Incomplete volumes are hidden from
ordinary volume selection and cannot be cloned through public volume commands.
Readiness is published only after consuming the complete response, checking
SHA-256, successfully finalizing the libvirt stream and confirming backend format,
capacity and identity. Durable verification metadata is stored in a private
<tasks.directory>-images directory; keep it alongside task history when backing
up the application. It contains metadata only. Reuse checks pool UUID, volume key,
modification/change timestamps, format and capacity. A matching path alone is
never adopted. External modification invalidates readiness. Removing a managed
source makes it downloadable again; the next explicit create verifies a fresh
transfer.
Ordinary transfer failures attempt to delete only staging created by that
operation, recording confirmed effects and cleanup errors. A verified source is
retained if later VM provisioning fails. Shutdown/interruption retains uncertain
staging for inspection. Stale running tasks become interrupted; they are never
automatically resumed or replayed. Before retrying, inspect the failed task’s
exact resources and backend state, remove confirmed unused incomplete storage if
necessary, and explicitly release uncertain task locks through the task UI.
Never remove storage used by a VM or unrelated pre-existing volumes.
A new create after confirmed cleanup can retry explicitly; waiting requests see
the active preparation’s failure. There are no background retries, upstream
polls, automatic image updates or automatic deletion of old revisions. Updating
an image requires an explicit configuration edit of URL/checksum together.
Accepted commands retain their image definitions and pool identities, and
existing VM disks stay unchanged. Old source revisions remain protected and
hidden until an administrator deliberately handles them.
Publisher provenance and maintainer refresh
The source verification record, docs/data/image-sources.json,
contains each official direct URL, publisher checksum URL/algorithm/digest, the
calculated literal SHA-256, observed HTTP byte count/type and inspected QCOW2
virtual capacity. Where publishers supply only SHA-512 (Debian and Alpine), the
artifact was streamed through SHA-512 and SHA-256 together, checked against the
publisher SHA-512, and the calculated SHA-256 was pinned in configuration.
No image payload was saved during that verification.
To refresh intentionally:
Select a maintained release/build and architecture from the official publisher.
Prefer a dated/build-specific artifact over a latest alias. Confirm its boot
variant, cloud-init support and minimum resources from publisher documentation.
Update that entry’s official artifact/checksum URLs and expected publisher digest
in docs/data/image-sources.json. Remove its old sha256 for an intentional
revision change. Obtain manifests over HTTPS and verify publisher signatures
where available using trusted distribution keys.
Run python3 scripts/verify-image-sources.py --record. This explicit maintainer
command streams each artifact without saving payloads, checks publisher digests,
inspects the header/HTTP metadata and records SHA-256. Without --record, it
verifies the pinned records without rewriting them.
Copy the verified URL/SHA-256 pair into vmango.dist.conf, review firmware,
initialization and resource defaults, and update documentation together.
Run configuration/domain/API/UI checks. Run a real Alpine download-to-boot test
as described in acceptance/README.md; record release, architecture and backend.
Source/checksum validation establishes artifact identity and format. It does not
establish that a guest boots or provisions correctly. Real boot checks and their
backend-specific results are recorded separately in the acceptance documentation.
Register the image
Check the publisher’s checksum, unpack the image if needed, and place it in a
libvirt storage pool. Register a catalog entry in
vmango.conf:
The block label is a stable image identifier, separate from path. name
is the display name (it defaults to the identifier). os_arch must be
x86_64 or aarch64. For path-based entries, the selector shows images matching the selected
architecture whose source volume is visible, available and not attached to a VM.
The catalog is shared across all nodes. Vmango resolves path on the selected
node and reads that volume’s actual capacity and format. A volume on another
node cannot satisfy a missing source. The same path on several nodes intentionally
receives the same settings; administrators must ensure its contents match the
image description. Path-based entries require an administrator-provisioned source on each selected node. Downloadable entries use the lazy managed flow described above.
Several entries can reference the same disk with different defaults:
image"ubuntu-unmanaged" {
path="/var/lib/libvirt/images/ubuntu-cloud.img" name="Ubuntu without provisioning" os_name="Ubuntu" os_arch="x86_64" guest_agent=false initialization="none"}
Selecting this identifier disables the guest agent channel and omits the config
drive. It does not change the ubuntu-server entry or the shared source disk.
Creation defaults and requirements
Setting
Values
When omitted
firmware
auto, bios, efi
Existing backend firmware selection
disk_bus
virtio, scsi, ide
virtio
disk_controller
virtio-scsi (requires disk_bus = "scsi")
Backend-selected controller
nic_model
virtio, e1000, rtl8139, subject to backend support
virtio
guest_agent
true, false
true
graphics
none, vnc, spice, subject to backend support
vnc
video_model
none, cirrus, qxl, virtio (2D), subject to backend support
none
initialization
none, nocloud, openstack
Selected node’s config_drive_write_format
minimum_memory_mib
Nonnegative integer, MiB
No additional minimum
minimum_disk_gib
Nonnegative integer, GiB
Source volume capacity
graphics = "none" requires video_model = "none" (or omission). The image
owns these guest device settings. The graphics listener is a private
graphics_listen IP address in each cloud host block, resolved after host selection;
it does not belong to an image or type. Omission preserves the backend listener
default.
The backend checks capabilities for the selected architecture and node. A listed
option is not necessarily supported by every backend. For example, built-in
QEMU user networking and socket-vmnet support only virtio NICs.
The simplified cloud form resolves launch settings from the selected image,
instance type, network and storage class. It does not expose device, firmware,
guest-agent or initialization overrides. Administrators configure these settings
in HCL; explicit false and initialization none remain distinct from omitted
values. Conflicting requirements are rejected rather than silently overridden.
Instance types set CPU, RAM and the size of a newly provisioned boot disk. Image
minimum memory, minimum disk size and actual source virtual capacity are checked
before cloning. An instance type with an undersized boot disk is rejected; no
clone shrinks the source. Additional data disks have independent sizes. Changing
a stopped VM’s instance type stays on its current host and preserves all existing
disk sizes; insufficient host capacity produces an error.
Editing image policy affects future creations, not existing VMs. There is no
per-machine policy override or PATCH endpoint for changing guest-agent, graphics
or video settings. Explicit instance type changes apply CPU, RAM, hugepages and
autostart while preserving existing guest devices, graphics listener and disk
sizes. Adoption also preserves the existing VM configuration. Accepted tasks
retain their policy and private binding snapshots. Restart Vmango after changing
the configuration to reload the read-only catalog.
Required image data disks
An image can declare blank disks that every new VM needs. Add one or more
data_disk blocks inside the image block:
data_disk"userdata" {
size_gib=16}
Each label is a unique disk name within the image; root is reserved for the
boot disk. size_gib is a positive integer. Vmango creates these disks
automatically using the VM’s selected storage class and disk format, attached
through VirtIO. The boot disk comes first, followed by image data disks in their
declaration order, then any additional disks chosen by the user.
The creation form displays required image disks without edit or remove controls.
API callers also receive them automatically and should not repeat them in
new_disks; a user disk with the same name is rejected. Storage capacity checks
include the required disks. They start blank, so the guest must partition and
format them as needed.
Image disk configuration applies to new machines. It does not modify existing
VMs, and accepted creation tasks retain the disk definitions from acceptance.
Images without data_disk blocks keep their existing behavior.
Configuration migration and volume policies
Top-level image blocks and cloud.images reference lists are removed. Move each
image into its owning cloud block. Copy formerly shared definitions explicitly
into every cloud that uses them. For a path-labeled image, choose a stable catalog
ID and put the former label in path:
IDs match ^[A-Za-z0-9][A-Za-z0-9_.-]{0,127}$ and are unique within their cloud;
source paths need not be unique. efi = true still maps to firmware = "efi" and
efi = false maps to firmware = "auto"; conflicting settings are rejected.
Omitted settings retain launch inheritance, including the target host’s config
drive format. Restart to activate file edits.
Legacy image blocks used only for volume policy become top-level volume blocks:
protected prevents deletion and hidden excludes an ordinary volume from
listing. Neither flag hides an image definition from Administration. Explicit
volume policies retain their path semantics. Policies derived from a cloud image
apply only to that cloud’s configured hosts; equal source paths in unrelated
clouds do not share protection, hiding or attachment exclusions. Multiple images
using one source on the same backend combine source policy (any true applies).
Managed sources retain their existing physical protection independently of these
configured flags.
Preserve task, artifact and volume-ownership metadata during migration. Queued
tasks keep their accepted source/default snapshots and backend identities, even
if the running catalog now differs. Unsafe legacy commands fail before mutation
and require explicit resubmission; history and locks remain available for review.
Android ARM64 with LineageOS
The community LineageOS QEMU builds
provide a complete ARM64 UEFI system disk. The v2026.10.20 prerelease targets
upstream QEMU and works with macOS HVF; it does not require Android Emulator or
Cuttlefish host services. The archive contains a UTM bundle, but Vmango uses its
vda.qcow2 directly.
Add this definition inside the cloud that owns the ARM64 host. Vmango downloads
the pinned release archive
and selects LineageOS_on_arm64.utm/Data/vda.qcow2 automatically; no manual
extraction, source-volume registration or local path is needed. Configure the
host’s image_pool as described above.
Restart Vmango to load the catalog. Select an ARM64 host and a type with at least
2 vCPUs, 2 GiB RAM and a 5 GiB boot disk. Selecting this Android image automatically
adds the required blank 16 GiB userdata disk. Android uses the cloned system
disk as vda and formats the second disk, vdb, for /data on first boot.
The archive’s vdb.qcow2 and efi_vars.fd are not extracted: Vmango creates the
blank disk and libvirt creates fresh UEFI variables.
Open the machine’s console, select VNC, and connect to complete the LineageOS
setup wizard. New ARM64 graphical VMs include USB keyboard and tablet input;
video_model = "virtio" uses 2D graphics without host OpenGL acceleration.
SSH keys and cloud-init user data do not configure this image.
Verified on 2026-11-03 through Vmango’s creation API on an Apple M1 Pro with
QEMU 9.2.3, libvirt 11.2.0 and HVF: Vmango downloaded the release ZIP, verified
both passes, selected the system disk and started a 2-vCPU/2-GiB VM with an 8-GiB
boot disk and automatic 16-GiB userdata. The guest reached the LineageOS setup
wizard. Display and pointer input were also checked through Vmango’s browser
VNC console in the earlier local-source test. These checks do not establish
Linux/KVM compatibility, accelerated graphics, audio or application compatibility.
Launch a machine
Choose a namespace before opening Create machine, then
select one of its allowed clouds. Keys and saved templates come from that
namespace; the new machine and its disks will belong to it.
Choose a configuration. In the selected cloud, choose an image, instance
type, availability zone, logical network and storage class. Valid single
choices are selected automatically.
Make it yours. Select SSH keys and optionally provide cloud-init user data.
Optional placement labels express required constraints or soft preferences.
Create and follow progress. The durable task inventories the cloud and
schedules a compatible host, prepares a missing downloadable image, clones
the boot disk and supplies guest initialization. The assigned host is visible
read-only in machine details. The OS configures itself on first boot.
Once your hosts and images are set up, launching another machine is a single
form and a click. Your infrastructure stays on your own hardware.
6 - Configured clouds and scheduling
Define a cloud catalog and automatically place machines on prepared libvirt hosts.
Vmango exposes configured clouds rather than asking users to assemble a libvirt
domain. Administrators prepare hosts, pools and networks and define their private
bindings. Users select an image, instance type, AZ, logical network and storage
class. The scheduler assigns a host, shown read-only in the machine details.
Configure a cloud
Keep the image definitions from the shipped configuration, or define images
using the image guide. Define each host’s connection and backend
settings directly in its cloud. The example assumes an active libvirt network
named default and a writable pool named default; Vmango does not create them.
Each host owns its libvirt connection and belongs to exactly one cloud and AZ.
To add another host, add a host block with its own uri, zone and network/pool
bindings. Host names and connection URIs must be globally unique across clouds;
several hosts can share the same AZ. Use architecture-appropriate image IDs;
unsupported combinations are rejected.
Connection settings uri, image_pool, config_drive_pool,
config_drive_suffix, config_drive_write_format, emulator, graphics_listen,
qcow_prealloc_metadata and cache all belong directly in cloud.host.
image_pool and config_drive_pool default to default,
config_drive_suffix to _config.iso and config_drive_write_format to
nocloud. graphics_listen defaults to the backend’s listener setting.
Migrate existing connections
Move the contents of each former top-level libvirt "name" block into
host "name" in its cloud, then remove the top-level block. Preserve the exact
host name, URI and pool settings so resource routes, task scopes and image
ownership stay associated with the same backend. Top-level libvirt blocks and
legacy libvirt_uri / libvirt_config_drive_* options now fail startup with a
migration instruction. Backend settings do not belong in the public cloud API.
Resources and placement
cpu sets the actual vCPU count. cpu_request defaults to cpu, must be positive
and no greater than it, and affects admission only; it does not impose quotas or
CPU shares. Memory requests equal guest RAM; memory overselling is unsupported.
boot_disk_gib sets the size of a newly created boot disk and must satisfy the
image minimum. Additional disks have independent sizes.
Each create inventories all cloud hosts, including stopped and unmanaged VMs.
Existing VMs without scheduler metadata count at their actual configured CPU/RAM.
Failed inventory reads fail admission. Host reserves reduce the available budget;
disk and lazy image preparation capacity are checked too. Competing provisioning
and storage commands execute serially so they cannot admit the same capacity twice.
Placement is optional. Required equality labels filter candidates; preferred
labels affect scoring and do not guarantee a match. Only advertised attributes
are accepted. These semantics are independent of libvirt node names. With no
hints, placement is automatic within the selected AZ.
Disks, interfaces and existing machines
A storage class maps to a pool on each host. The same class on two hosts does not
make storage shared. A standalone disk is scheduled within its AZ and remains
host-bound after detachment. A new disk for an existing machine uses that machine’s
host. Selecting existing local disks during creation constrains placement to their
owning host; disks from different hosts cannot be combined or silently copied.
The main Networks page lists the selected cloud’s logical network catalog,
including display names and network IDs. Its cloud selector scopes the list;
multiple host bindings for one logical network appear as one entry. Backend
libvirt network names are shown as read-only diagnostics on each Hosts detail
page and remain available through the read-only host diagnostic API
under /api/v1/administration/clouds/{cloud}/hosts/{node}/networks. Administrators provision those networks
outside Vmango.
Interfaces select a configured logical network, resolved on the existing host.
Interface attachment accepts network (a logical network ID) and optional mac.
NIC model and VLAN are selected by the administrator’s host network binding;
model, vlan and other unsupported request fields are rejected. Observed
interface responses retain model and vlan for diagnostics.
Custom network creation remains outside this workflow.
Unmanaged VMs are visible and counted, but read-only until explicit adoption.
Adoption does not change resources, power state, disks or placement, and does not
claim ownership of pre-existing disks. Deleting an adopted VM preserves unowned
disks. Preserve the private volume ownership metadata alongside task history.
An explicit instance type change requires a stopped managed VM, stays on its
current host, applies the selected type’s autostart policy and preserves all
disk sizes, applied guest devices and graphics listener bindings. If that host lacks resources, the task
fails; there is no automatic migration, stop or restart. Catalog edits never
silently resize or reconfigure existing machines or disks.
Set autostart in instance_type blocks (default false). Image settings
guest_agent, graphics and video_model control guest integration and devices;
their defaults are true, vnc and none. The cloud’s private host block
sets graphics_listen as an IP address, with omission preserving the backend
default. Creation’s start flag is a separate one-time action. Adoption preserves
existing policy and devices, and accepted tasks snapshot policy and private host
bindings. None of these five settings accepts per-machine overrides; the machine
PATCH endpoint is removed and effective values remain read-only.
System disks and boot order
Vmango assigns an explicit boot priority to the system disk when creating a VM
or attaching disks. The root attachment alias identifies the system disk. If
there is only one ordinary disk, it can be selected without an alias. The
configdrive disk contains cloud-init data and is never selected automatically
as the system disk, even though it is attached through virtio.
When reattaching a system disk to a machine with other data disks, set its alias
to root. Vmango does not guess which of several unlabelled disks contains an
OS. Device names and PCI addresses are preserved; the system disk need not be
vda.
Legacy hd/cdrom boot settings are converted on disk attachment when a system
disk can be identified. An already attached installation CD keeps its configured
precedence. Existing explicit bootable hard disks, direct kernel boot and legacy
PXE-only or mixed PXE boot policies are preserved. With per-device priorities, a
reattached system disk is added after existing optical/network boot entries when
no hard disk has a priority. Newly attached installation media can be selected
through the firmware boot menu or an explicit libvirt boot configuration.
Existing machines are not rewritten or restarted merely by upgrading Vmango.
Disk attachment requires a stopped VM, and the updated boot order takes effect
on its next start.
API and migration
Machine, disk, interface and native console operations use /api/v1/clouds/{cloud}.
Create uses catalog references and an AZ without a host input. Machine URLs use
the stable VM UUID. Volumes use /clouds/{cloud}/volumes/{volume} with unpadded
base64url(node) + "." + base64url(path) as the compound ID. VM disk references
and existing_disks: [{volume_id}] use that same ID without a separate public
host field. These addresses do not move a resource. Every request validates
cloud membership. All mutations use durable tasks with visible progress and
diagnostics.
Volumes, like Machines, shows one selected cloud’s flat inventory. Both list APIs
return {items, unavailable_hosts}; partial failures preserve successful rows and
remain explicit even when every host fails. VM/volume detail provides the logical
catalog needed by ordinary forms. A null catalog means supplemental discovery
failed; empty arrays mean known-empty choices. Dedicated infrastructure browsing
is under Administration → Clouds → Cloud; Tasks keeps its existing URLs.
The old /api/v1/nodes/..., /api/v1/hosts/..., host-segment volume routes and
global /vms, /volumes and /networks endpoints are removed without aliases. Read-only administrative diagnostics use
/api/v1/administration/clouds/{cloud}/hosts/....
Authentication remains installation/principal scoped. Workloads, SSH keys,
cloud-init templates and workload task history require an explicit configured
namespace. The same cloud may serve several namespaces; Administration inventory
and history remain independent of workspace selection. See the repository
namespace user guide for configuration and everyday use,
or the migration guide
for existing installations.
See Automation API for Swagger UI, authentication and an overview
of supported operations. The repository’s
API reference lists the
routes, task behavior and console examples. Binary
archives include QUICKSTART.md, API.md, CLOUDS.md, IMAGES.md, TASKS.md
and MIGRATION.md for offline reference. They use the maintained repository
guides, with internal guide links adjusted to the archive filenames.
7 - Automation API
Explore Swagger UI, authenticate API clients and automate virtual machine operations.
Vmango provides a versioned JSON API under /api/v1. It powers the web
interface and is also available to scripts, CLI tools and CI jobs.
List, create and delete virtual machines; start, reboot or power them off;
change instance types and manage attached disks and network interfaces.
Create, clone, grow and delete volumes, and manage SSH public keys.
Inspect host capabilities, networks and storage pools through read-only
administrative endpoints.
Track asynchronous tasks and connect to serial or VNC consoles over WebSocket.
Machine and volume operations are scoped to a cloud. Creation requests select
catalog entries and an availability zone; the scheduler chooses the host.
See configured clouds and scheduling for the resource model.
Open Swagger UI
Open /api/docs on your Vmango server, for example
https://vmango.example/api/docs. You can also choose API documentation
from the account menu in the web interface.
Sign in with your usual Vmango account, using a local password or your configured
OIDC provider. Swagger UI uses that browser session to load the specification
and authenticate requests automatically. Expand an operation to inspect its
parameters, request body, responses and schemas. Try it out sends real
requests to your installation, including any selected create or delete operation.
The server also exposes its OpenAPI 3.1 specification at /api/openapi.json.
Fetching it requires Bearer authentication, just like protected resource
endpoints. Use the specification from your running server for its supported
operations and exact request formats.
Authenticate scripts and CI jobs
Sign in to the web interface and open the account menu.
Choose API tokens, then Create token.
Give the token a name and choose its lifetime. The default is 90 days;
the maximum is 365 days.
Copy the token when it is shown. It is displayed only once.
Send the token in the Authorization: Bearer TOKEN header over HTTPS. For
example, save the following in ~/.config/vmango/curl.conf, replacing the
placeholder with your token, and restrict the file permissions to 0600:
The same configuration can fetch /api/openapi.json. Store tokens in a
protected client file, keychain or CI secret; keep them out of URLs, source
control and logs. HTTP is supported only for loopback development.
Before RBAC, personal tokens can select any configured namespace. Workload
requests require X-Vmango-Namespace; discover choices through authenticated
GET /api/v1/namespaces without that header.
They cannot manage API tokens or issue console sharing links. Logging out of
the browser does not revoke them: use Revoke on the API tokens page.
Replace tokens before they expire. Missing, expired or revoked credentials
return 401 Unauthorized; clients must use Bearer tokens rather than Basic
Auth or browser cookies for protected resource requests.
Follow operation progress
Infrastructure changes run as durable asynchronous tasks. Send a unique
Idempotency-Key header with each new command. A successful submission returns
202 Accepted, a task and a status_url; poll that URL with the same Bearer
authentication until the task finishes. Acceptance does not mean the operation
has completed successfully.
If a submission response is lost, retry the same command with the same key
to retrieve its original task. Inspect a failed or interrupted task before
submitting another command. Task history survives server restarts and is
available under /api/v1/tasks.
For detailed examples and contracts, see the repository’s
API reference and
task guide.
The console WebSocket protocol is included in OpenAPI and is also available
through the Console protocol link in Swagger UI. Binary release archives
include API.md and TASKS.md for offline reference.
8 - Cloud-init templates
Save reusable user-data and select one template when creating a machine.
Cloud-init templates store reusable user-data for new machines. Like SSH public
keys, the catalog belongs to the selected namespace and is independent of cloud.
Authenticated operators can select any configured namespace until RBAC is added.
Template IDs and revision checks never resolve through another namespace.
Create and use a template
Open Cloud-init templates and create a template with a name, optional
description and user-data text.
Open Create machine and select an image that supports initialization.
Select one saved template and review its contents. Select Customize to
copy it into the manual editor for this machine without changing the catalog.
Select SSH keys separately and create the machine.
For example, this cloud-config writes a marker on first boot:
#cloud-configwrite_files:- path:/etc/vmango-provisionedpermissions:'0644'content:| Provisioned with a saved Vmango template.
Select None to omit user-data, or Custom to enter user-data manually.
Only one source can be selected. Images with initialization = "none" cannot
use a template or custom user-data.
Vmango preserves the submitted text. It does not merge templates, substitute
variables or restrict user-data to YAML; cloud-init scripts and MIME documents
can also be saved. Both saved and manually entered user-data must contain at most
256 KiB of UTF-8 text without null characters. SSH keys
and the hostname continue to use the existing config-drive metadata. Their
interaction with explicit user-data settings is governed by cloud-init.
Revisions and accepted tasks
The form submits the revision that was reviewed. If another user edits the
template before creation is accepted, reload and review the updated contents.
Editing and deleting templates also require the current revision, preventing
one user from silently overwriting another user’s changes.
When Vmango accepts a creation task, it saves a private copy of the selected
user-data with that task. Later edits or deletion of the template do not change
accepted tasks or existing machines. Repeating an accepted request with the
same idempotency key returns its original task.
Storage
The application stores namespace templates and SSH keys beneath:
namespace_directory="/var/lib/vmango/namespaces"
The default is ~/.vmango/namespaces; the catalog is catalogs/catalogs.json
inside that directory. It must be writable by the Vmango service account. Vmango
uses private directories/files and a process lock. Include the namespace directory
in protected backups. Template contents may contain credentials and are stored
without encryption. The old cloud_init_templates_dir remains a legacy migration
source; selected entries are imported explicitly with their IDs/revisions intact.
Removing a namespace from configuration preserves its saved catalog.
The catalog list omits user-data. Template detail responses require
authentication and are not cacheable. User-data is excluded from public task
history and is removed from private task payloads when those tasks finish.
API
Use /api/v1/cloud-init-templates to list or create templates and
/api/v1/cloud-init-templates/{id} to read, update or delete one. Updates and
deletions include the reviewed revision; stale revisions return HTTP 409. All
requests require X-Vmango-Namespace for the selected configured namespace.
Machine creation accepts either user_data or a reference:
Supply the other required machine fields and the Idempotency-Key header as
usual. The authenticated API documentation in Vmango describes the complete
request schemas.
9 - Build from source
Build and run Vmango for local development.
Building requires Go 1.26 or newer, a C compiler, pkg-config and the libvirt
development libraries, Python 3 and Node/npm (the pinned Node version is in
ui/.nvmrc). Creating and reading cloud-init config drives also
requires mkisofs and isoinfo, provided by genisoimage or compatible tools.
git clone https://github.com/subuk/vmango.git
cd vmango
make
cp vmango.dist.conf vmango.conf
Edit vmango.conf for your host and web login before starting the server.
Use ./bin/vmango genpw to generate a password hash for your configured user.
The shared JWT and console signing key is generated on startup when missing.
The quick-start guide
explains host connections, storage pools and authentication; use
./bin/vmango in place of ./vmango when following it with a source build.
The example configuration
documents the available settings.
./bin/vmango web -c vmango.conf
Open localhost:8080 once the server is running.
Use HTTPS when exposing the web interface remotely, as described in the
quick-start guide.
Linux with QEMU/KVM is the main target. Local development on macOS is also
possible with QEMU/HVF; see the
README for prerequisites.
Verify changes
Run make test to build the embedded browser assets and run the Go tests.
Run make ui-test for frontend regression tests and generated API-type checks.
Distribution source archives include ui/dist and its source/asset digests; use
make UI_PREBUILT=1 to verify and build them without Node or npm.
For real VM lifecycle checks, follow the
acceptance testing guide.
Local Go tests do not establish that real hypervisor operations work.
Code, bug reports and contributions live on
GitHub. Include your Vmango version, host
setup and relevant logs when reporting an issue.